Categories: Expert
Demonstration Video
The project runs on the general basis of overall improving the average home user’s sprinkle system. We observed that there is much room for improvement over a basic mechanical sprinkler timer. Our design will be an autonomous sprinkler system capable of monitoring outdoor conditions and adjusting sprinkler settings accordingly. The system will measure soil humidity, weather data, and watering schedules to determine which sprinklers in our network should run. Using local network connections, TI’s CC1310 Launchpads, a Beagle Bone Black, Amazon Web Services, and the OpenWeatherMap weather API, we will communicate moisture data, weather data, and user preferences to determine when to sprinklers on and off. The system will run both indoors and outdoors and will be able to remain running with little to no physical maintenance. Devices running outside will be solar powered and switch on to transmit information periodically and minimize power usage. Using a cloud hosted web interface, a user will be able to input desired watering options and view live data of their outdoor conditions. The web interface will also allow the user to schedule watering and override computer settings. The current system status will also be provided. Using our on-board program for the hub, the system will save water by not allowing the system to run when the soil is saturated, when it is currently raining, or when it is predicted to rain soon.
Electronics
Our system is divided into 4 major components. Each component serves a crucial purpose in ensuring the integrity of the system.
TI
CC1310
Launchpad
The CC1310 Launchpads provide an efficient, low power communication that will allow us to wirelessly send information back and forth between outdoors and our hub over a large distance. This will benefit us in that our system will typically operate over distances from the backyard to the garage. The ultra-low power mode of the launchpad will also help sustain the system outdoors for long periods of time with minimal power. This will help ensure a longer system uptime for our design.
Beagle
Bone Black
With the hub portion of our project resides the Beagle Bone Black. The Beagle Bone Black provides complete access to a Linux terminal which we will access to run higher level access scripts to bridge our website to the CC1310. This will allow us to perform HTTPS queries between our operated website using Python as well as generate and parse API requests to OpenWeatherMap to retrieve local weather information. In additon, we will also utilize Python to talk with the hub’s CC1310 through a direct UART connection. Python will also serve us in parsing information and maintaining the overall program logic of the system.
Capacitive Moisture Sensor
The capacitive moisture sensor provides a robust way to obtain an analog representative value corresponding the moisture level in the surrounding soil. Rather than a simple 0/1 representation of wet vs dry, we are able to read a relative amount of water saturation in the soil with values scaling from 0-100. Additionally, because the sensor is capacitive (unlike its resistive alternatives), it is corrosive resistant and not as likely to deteriorate over a long period of time.
User Controls
The user controls service to give an individual access to their sprinkler system anytime and anywhere. These controls can be accessed on any web-capable device.
Cloud Hosted Service
The cloud hosted service we provide is the gateway between the user and the system. Using a basic UI we allow the user to see a status of the system as it is currently operating. The user will know if the system is on and which sprinklers are running. The weather is provided for convenience. Also provided are a manual override button and the schedule preferences. The user can toggle the override button to enable the sprinklers in the system. The user can also input a scheduled start and end time for the system to designate all possible times the system may run. All of this information gets stored in a database on our server and later gets parsed by the Beagle Bone Black. The website used for our installation is at
http://www.dnedesign.us.to
Assembly
Transmitter
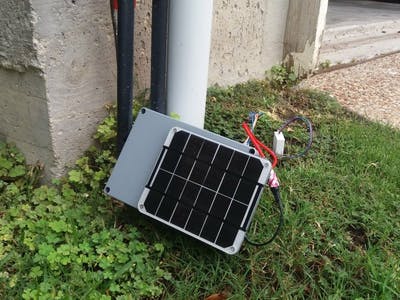
For the transmitter, a charging circuit was connected to a battery and the micro-controller. A capacitive moisture sensor was read using SensorController Studio and processed with Code Composer Studio to minimize power consumption. This data gets transmitted to the receiver acting as the sprinkler hub. This assembly is capable of lasting 3.7 years on ultra low power mode from full charge without any extra power from the solar panel. With the solar panel, this setup is capable of lasting for the life of the parts.
Receiver
For the assembly, all the relays were soldered to a protoboard with inputs from a transistor circuit triggered by the CC1310 digital pins. These relays switched to a 12V 2A DC source used to power the sprinkler solenoids.
Installation
For the installation of the wireless sensor nodes, they only require outdoor placement and for the moisture sensor to be grounded where desired. The enclosures will protect all electronics from the elements through a weather tight seal.
To install the hub, remove any old components from the old sprinkler box. Each of the remaining wires can be connected to the relay board. After the connections are placed, plug the system in using a USB power adapter and the AC to DC power adapter. The system can then be tested using the website’s scheduling system and manual override buttons. An example is available at
http://www.dnedesign.us.to
Enclosure
Top and bottom of the moisture sensor enclosure. This was used to keep the electronics sealed and weather proof, permitting a long lasting installation.
Comments are not currently available for this post.