Hello everyone. I have been recently working on porting MicroBlocks to BeagleConnect Freedom. This also involved work improving Arduino module for Zephyr since MicroBlocks uses Arduino APIs. I will now go over using MicroBlocks on Beagleconnect Freedom.
What is MicroBlocks?
MicroBlocks is a free, Scratch-like blocks programming language for learning physical computing with educational microcontroller boards. It allows complete beginners to get started quickly, from children as young as nine years old up through adults of all ages.
However, MicroBlocks isn’t just for beginners. It can be used to learn electronics, instrument science experiments, automate your home, and much more.
Technical Details
Let us first review the technical details of how all of this works. BeagleConnect Freedom already has Zephyr support. However, MicroBlocks uses Arduino APIs, and migrating everything to Zephyr APIs would take a lot of work. Additionally, the final goal is to have everything merged upstream, and thus, it is better to have as little maintenance burden as possible.
I am using Arduino Core API module for Zephyr, which implements Arduino APIs on top of Zephyr. Adding support for Beagleconnect Freedom was pretty painless since all it amounts to is a device tree overlay (board porting instructions). I had to add some missing APIs, but the process was pretty painless. Some missing APIs have already been merged, while others have active PRs.
Prebuilt Images
The latest MicroBlocks vm-firmware images for BeagleConnect Freedom are available here. This demo was made using zephyr-microblocks-rc1 image.
- Download MicroBlocks vm-firmware and extract image
cd ~
wget https://files.beagle.cc/file/beagleboard-public-2021/images/zephyr-microblocks-rc1.zip
unzip -j zephyr-microblocks-rc1.zip
Flash Image
- Install `cc1352-flasher`.
pip install cc1352-flasher- Find the BeagleConnect Freedom serial port. It is `/dev/ttyACM*` on Linux. It can be checked using the following command:
$ udevadm info /dev/ttyACM0 | grep "BeagleConnect"
E: ID_MODEL=BeagleConnect- Flash image.
cc1352_flasher --bcf ~/zephyr.bin -p '/dev/ttyACM0'Run MicroBlocks IDE
- Download MicroBlocks standalone IDE.
- MicroBlocks IDE should automatically detect BeagleConnect Freedom. It might take up to a minute.
It is also possible to manually select BeagleConnect Freedom TTY by enabling settings->show advanced blocks in case you have lot of USB devices connected.
Demo
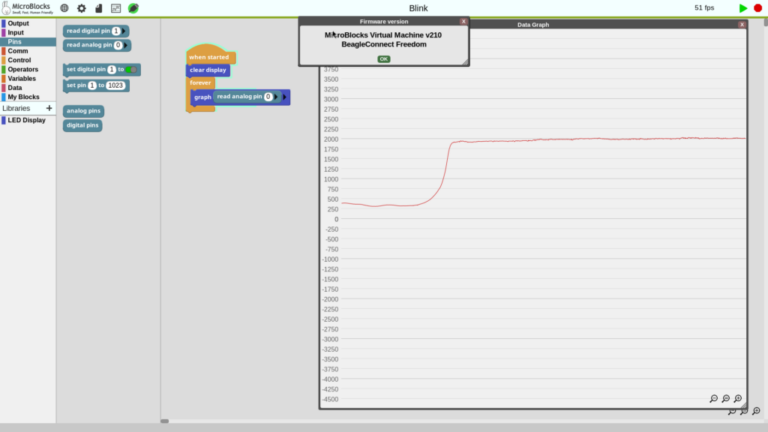
Here is a screenshot of graphing the output of a LDR sensor:

Building MicroBlocks Firmware
I will now go over building the images locally for those interested.
Install dependencies
Install dependencies present in Getting Started with Zephyr
Setup Zephyr SDK
Setup Zephyr SDK by following instructions in Getting Started with Zephyr
Build MicroBlocks Image
- Clone smallvm fork.
git clone https://openbeagle.org/ayush1325/smallvm.git -b zephyr ~/smallvm
cd ~/smallvm/zephyr- Build MicroBlocks image for BeagleConnect Freedom.
make beagleconnect_freedom- Copy image to common location:
cp ~/smallvm/zephyr/build/beagleconnect_freedom/zephyr/zephyr.bin ~/zephyr.bin- Go to the flashing instructions to flash the image to BeagleConnect Freedom.
Future
The PRs for all the required changes are already open for Arduino module for Zephyr and Zephyr. I am also actively working to get support merged to upstream MicroBlocks, which should allow much easier porting of MicroBlocks to Zephyr supported boards in the future.
Conclusion
There are still a lot of bugs, so feel free to open issues. I will also write more articles regarding Arduino API support for BeagleConnect Freedom